We cover the steps briefly at the top of this article, then continue below with additional information and pictures for the steps. When you create a new presentation in Microsoft Powerpoint, it is going to be in the landscape orientation by default. Since many of the screens on which you would display a presentation are going to be in that orientation, this makes sense. However, situations may arise where you need your slides to be vertical, or in the portrait orientation. Fortunately this is an option that you can adjust, although it’s in a location that is difficult to find if you don’t know where to look. In some other Microsoft Office products, like Microsoft Word or Microsoft Excel, this option would be found on a Page Setup menu. In Powerpoint, however, it’s someplace else. Our tutorial below will show you how to make your Powerpoint slides vertical in Powerpoint for Office 365. If you would like to include a circular image on one of your slides, then you can read our make a picture a circle guide and learn how to do it.
How to Switch to the Vertical Portrait Orientation in Powerpoint
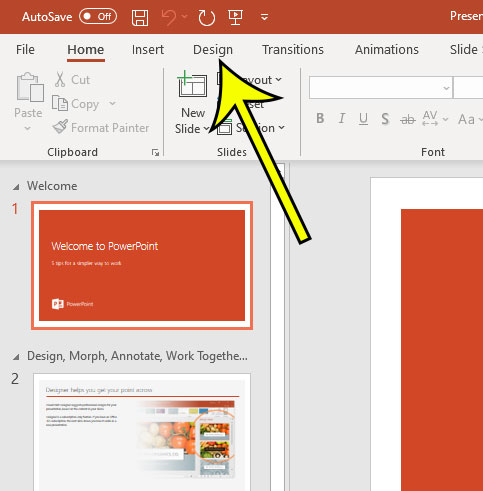
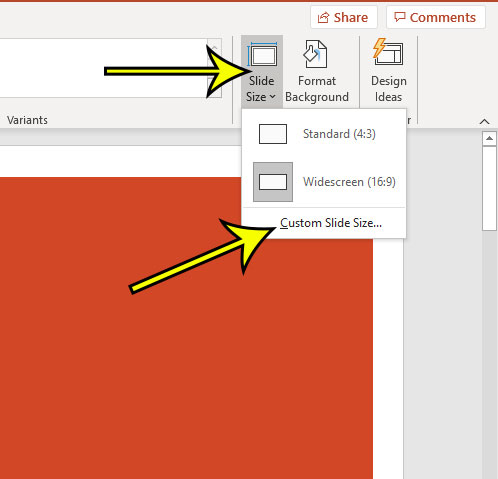
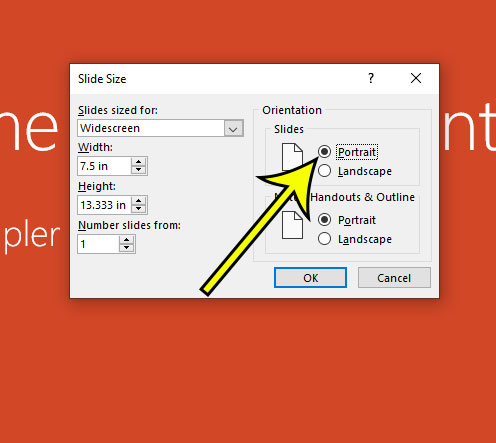
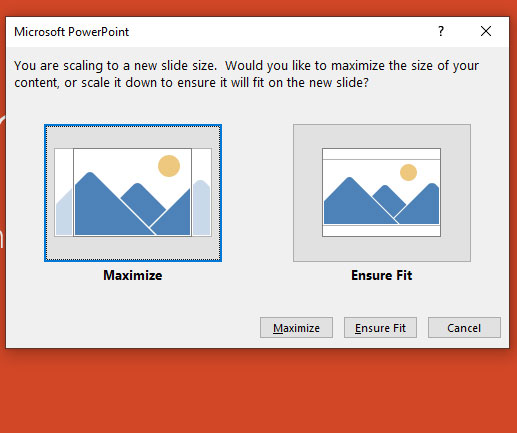
The steps in this guide were performed in the desktop version of Powerpoint for Office 365. By completing these steps you are going to put your current Powerpoint slideshow into the portrait orientation. If the slideshow has existing content on it, such as a text box, or a picture, then that content may be adjusted based on an option that you select during this process. Alternatively some of your slide content may get pushed off of the slide, so be sure to go back and proofread everything to make sure it looks alright. Step 1: Open the Powerpoint presentation that currently has landscape slides which you wish to convert to portrait slides. Step 2: Select the Design tab at the top of the window. Step 3: Click the Slide Size button in the Customize section of the ribbon, then choose the Custom Slide Size option from the drop-down menu. Step 4: Click the circle to the left of Portrait. Step 5: Select the Maximize or Ensure Fit option depending on what you would like Powerpoint to do with your existing content after it switches from horizontal slides to vertical slides. As mentioned earlier, existing slides layouts are typically impacted by this change. Additionally, if you are using a Powerpoint template and making this change, and would like to use portrait orientation for future presentations with this template, be sure to save it after adjusting this setting. If you are printing handouts of your presentation and would like to switch between portrait and landscape orientation, you can do so from the Print menu in addition to selecting the option from the Slide Size menu in step 4 above. Simply click the Full Page Slides button and choose the desired handout option, then click the Landscape Orientation option and choose Portrait orientation instead. If you switch between orientations then switch back, it’s likely that your slide layouts won’t revert to their original states. You will likely need to go through and resize a number of the objects in your slides. Find out how to print 4 slides per page in Powerpoint if you are either printing handouts for people, or if you want to work on your presentation from a hard copy and don’t wish to waste a lot of paper. He specializes in writing content about iPhones, Android devices, Microsoft Office, and many other popular applications and devices. Read his full bio here.