If you have never changed the default font in Microsoft Excel 2013, then the program is likely using the Calibri font for any new spreadsheet that you create. But if you dislike this font, or have another font that you would prefer to use when you are creating Excel files and entering data into your cells, then you might be wondering how to change the default font in Excel 2013. Fortunately, this is a setting that you can access on the Excel Options menu, and you can select from the list of fonts that are currently installed on your computer. Our guide below will direct you to where you can find the default font setting in Microsoft Excel 2013 and change it to a different font of your choosing.
How to Switch the Excel Default Font in Office 2013
Our article continues below with additional information changing the default font in Excel 2013, including pictures of these steps.
How to Use a Different Default Font in Excel 2013 (Guide with Pictures)
The steps in this guide are going to show you how to adjust the default font setting in Excel 2013. This means that any new spreadsheet that you create in Microsoft Excel is going to use the font that you select. However, any existing spreadsheets that you open will use the font that was set as the default when that spreadsheet was created.
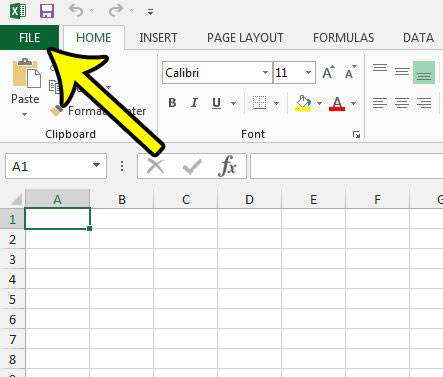
Step 1: Click the File tab at the top-left corner of the window.
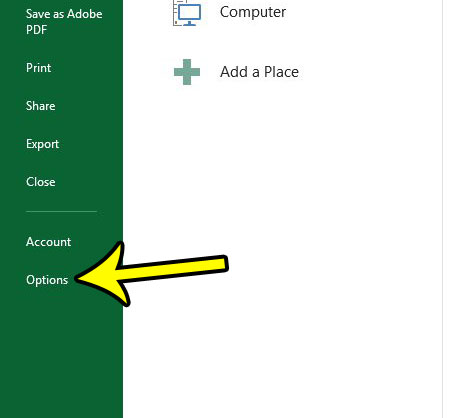
Step 2: Click the Options button on the left side of the window.
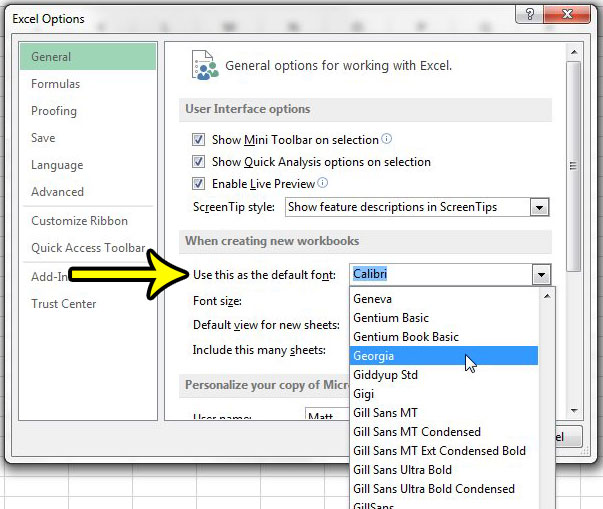
Step 3: Click the Use this as the default font dropdown menu, then select the default font that you wish to use.
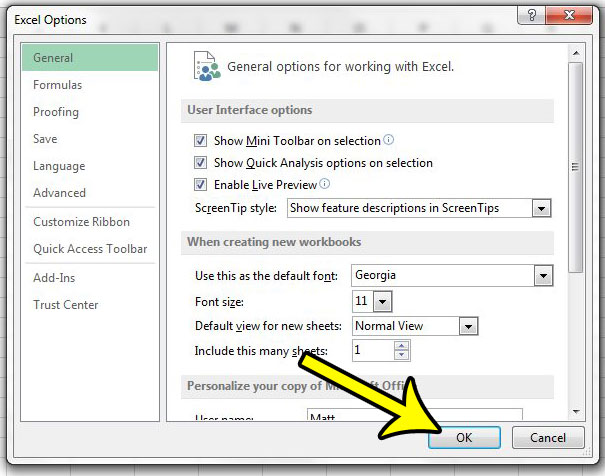
Step 4: Click the OK button to save your changes.
Step 5: Restart Microsoft Excel so that the new changes can take effect.
Our guide continues below with additional discussion on using a different default font in Microsoft Excel 2013.
Can I Also Change the Default Font Size in Excel?
Tes, there is also an option in the When creating new workbooks section of the Excel Options menu where you can specify the default font size, too. It’s the Font size dropdown menu under the default font selection that you used in the steps above. To recap, it’s found at File > Options > General. The other options in this section include the default view for new sheets and an option to choose the number of new sheets to include when you create a new workbook. As mentioned above when working with a new font that you choose in the font box, setting a new option in the font size box won’t affect the font size for existing workbooks that you have created in Microsoft Office or received from other people.
More Information on How to Change Default Font in Excel 2013
When you are selecting a new Excel default font you will be choosing from the fonts that are already installed on your computer. If you want to use another font that isn’t listed then you will need to download and install it from an online font repository like Google Fonts. Once you download the font you can unzip the downloaded file, then right-click on the font file and choose the Install option. If you already had the Excel Options window opened then you will need to select the General tab at the left side of the window to find the general category of settings, including the one that lets you choose the default font settings for multiple workbooks that you will create in the future. If you only want to change the font for the current workbook without affecting anything else then you can click the Home tab at the top of the window, then adjust the necessary options in the Font group of the ribbon. if you already have data in your cells and want to use a different font for that data then you will need to use your mouse to select it first. Is there a lot of formatting in your spreadsheet that you are having trouble removing? Learn how to clear cell formatting in Excel 2013 so that you can work with data that has not been formatted in other ways.
Additional Reading
He specializes in writing content about iPhones, Android devices, Microsoft Office, and many other popular applications and devices. Read his full bio here.


