But you may not include the correct number of rows or columns when you first create a table in Google Docs, so it’s possible that you will need to change the table structure. You can add a row to a Google Docs table by right-clicking on the table, then choosing the Insert row above or Insert row below option. Google Docs allows you to insert tables into your documents using the Insert tab at the top of the window. But if you find that the table you created needs another row, then you will need to know how to add a row to a table in Google Docs. At first glance, the table system in Google Docs may seem a little simple, but there are actually a handful of different settings and formatting choices available. One option that can be particularly useful involves the addition of more rows or columns. It’s fairly common for Google Docs tables to need more cells, as your initial selection of rows and columns may have been lower than you actually needed. Our guide below will show you how to add another row to your Google Docs table so that you can include the additional information that the table requires.
How to Add Another Row in Google Docs
Our article continues below with additional information on adding rows to a table in Google Docs, including pictures of these steps. Do you need to add an entire page in the middle of a document? Our how to add a page on Google Docs tutorial will show you a quick way to do it.
How to Add a Row Inside a Google Docs Table (Guide with Pictures)
The steps in this article were performed in the Google Chrome Web browser but will work in other desktop browsers as well.
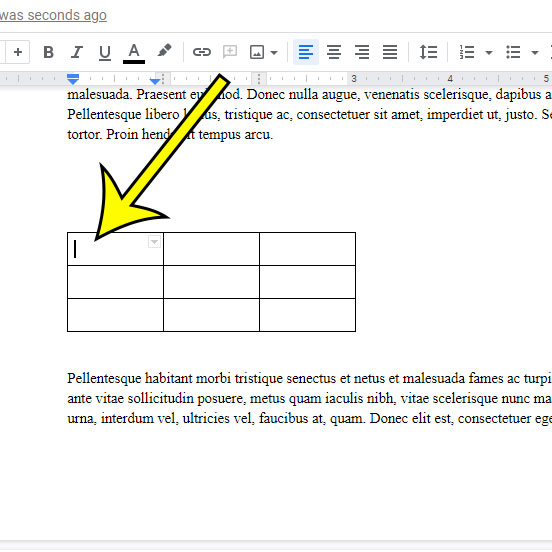
Step 1: Sign into Google Drive and open the Google doc containing the table you wish to adjust.
Step 2: Click inside a cell in the row that is above or below where you want to add your new row.
It’s important to select the correct insertion point for the additional row, or Docs will add it to the bottom of the table, or wherever the cursor is currently located within the table.
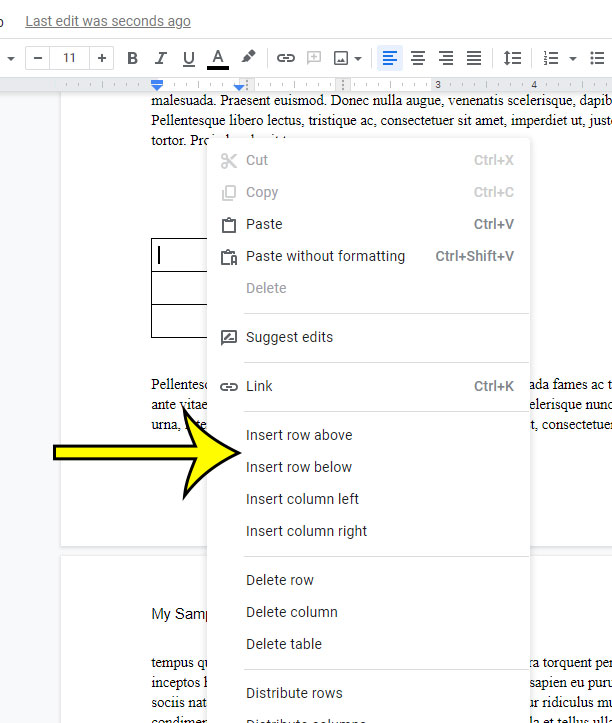
Step 3: Right-click on the selected cell to open the shortcut menu.
Step 4: Choose the Insert row above or Insert row below option.
Our tutorial continues below with additional discussion on adding rows to tables in Google Docs.
More Information on Google Docs Table Rows
You will notice that there are a number of options for modifying a table in Google Docs when you right-click on it. These options include:
Insert row aboveInsert row belowInsert column leftInsert column rightDelete rowDelete columnDelete table
Note that the shortcut menu also includes a Table properties option. If you open that menu you will be able to change things like the border, as well as minimum column width and row height. You can also adjust the cell vertical alignment from Table properties as well. If you select “Delete row” from the menu to delete a row from your table then you will also delete any data inside the cells in that row. While Google Docs provides ways for you to interact with a table row or the entire table, you might find it easier to work with rows, columns, and cells in Google Sheets. if so then you will be able to copy and paste cells from a spreadsheet in Sheets directly into your document. This can be a preferable option as you have more tools and formatting options available to you in Sheets, and it can be more efficient to make changes there rather than trying to format an existing table in Google Docs. You can also add rows to a table by selecting Format > Table at the top of the window. There you will also find the Insert row above and Insert row below options. If you want to change the cell background color in the table inside of a Google Docs document then you can select the cells to modify, right-click on them, select Table properties, then click the Color tab and adjust the color in the “Cell background color” dropdown menu.
Additional Reading
He specializes in writing content about iPhones, Android devices, Microsoft Office, and many other popular applications and devices. Read his full bio here.


